
How to add a world clock to your Mac's menu bar
Updated
macOS has no setting for a second time zone in the menu bar clock. The built-in alternative is the Clock app's World Clock widget: Control-click the desktop, choose Edit Widgets and add it, or add it to Notification Center. For world clocks one click away in the menu bar itself, you need a menu bar app.
If you work with people in other time zones, the clock in the top-right corner of your Mac is the obvious place to want their time. Unfortunately macOS only shows your time there. This guide covers what the built-in options can do, how to change the cities in Apple's Clock widgets, and how to get several time zones into the menu bar.
The steps match recent macOS versions (Sonoma and later, including macOS 26). Apple sometimes moves settings between releases, so look for the closest match if a label differs.
Can the macOS menu bar clock show another time zone?
No. The menu bar clock always shows the Mac's own time zone. You can change how it looks (digital or analog, with or without the date and seconds) in System Settings → Control Center → Clock Options, but there's no option for a second city. Changing the Mac's time zone in System Settings → General → Date & Time changes your whole system, so it doesn't help either.
That leaves three built-in places to see other time zones: the Clock app, desktop widgets and Notification Center widgets.
Option 1: the Clock app's World Clock
Recent macOS versions include the same Clock app as iPhone.
- Open Clock (from Launchpad, Spotlight or the Applications folder).
- Click World Clock.
- Click + and search for a city to add it.
The app shows each city's time along with sunrise and sunset. It's handy, but it's a window you have to open, not something you can see while you work.
Option 2: World Clock widget on the desktop
Since macOS Sonoma, widgets can sit on the desktop.
- Control-click (or right-click) an empty part of the wallpaper and choose Edit Widgets.
- Search for Clock in the widget gallery.
- Pick a size of the World Clock widget, or a single City clock, and click it to add it. You can also drag it to a spot on the desktop.
- Click Done.
Change the cities in the Mac World Clock widget
- Control-click the widget.
- Choose Edit “World Clock”.
- Click a city name, which is highlighted, and choose a different city.
- Click Done in the widget.
If Edit doesn't appear in the menu, that widget can't be configured. The World Clock widget can, which is how you swap Cupertino for the cities you need.
The catch with desktop widgets is visibility: they're hidden whenever windows cover the desktop. Clicking the wallpaper moves windows aside to reveal them, unless you've turned that off in System Settings → Desktop & Dock.
Option 3: World Clock in Notification Center
Notification Center is one click away from the menu bar, so it's the closest built-in substitute for a menu bar world clock.
- Click the date and time in the menu bar to open Notification Center.
- Scroll to the bottom and click Edit Widgets.
- Search for Clock and click the World Clock widget to add it. Drag it up or down to position it.
- Click Done.
Change its cities the same way: Control-click the widget and choose Edit “World Clock”. Now clicking the menu bar clock shows your world clock along with your notifications.
What the built-in options can't do
- No times in the menu bar itself. You always need a click (Notification Center) or a clear desktop (widgets).
- A few cities per widget. Fine for two or three places, cramped for a distributed team.
- No looking ahead. Widgets show the current time. To see what 16:00 tomorrow in Singapore is for everyone else, you still count hours.
A menu bar option: Timeslide for Mac
Timeslide is a world clock we make, and on the Mac it lives in the menu bar. Click it and your cities drop down as cards, each with its own time, sky and weather. Drag any card sideways, or swipe with two fingers, and one shared time moves across every city. You see at a glance what 10:00 in New York means for the team in Dubai or family in Tokyo. Click Now to jump back to the current time.
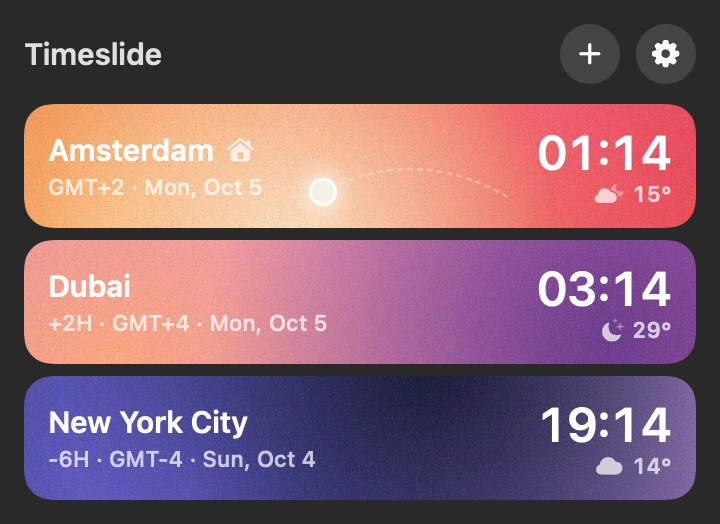
What it does in the menu bar:
- Icon or time. Show just the Timeslide icon, or a city's name and time right in the menu bar.
- Open at login, so your cities are always there.
- Five themes, including Sky, where each card shows the sky over its city at that hour.
- The same cities as on your iPhone. iCloud keeps cities, names and look in step with Timeslide on iPhone and Apple Watch. Or move them with a QR code or a link, with no account.
- 70,000 cities built in, searchable offline, plus Find my city to set your home city in one click.
- Rename cards to “Mum”, “Office” or “Client”.
Timeslide for Mac needs macOS 26 or later. It's free for up to three cities. Timeslide Pro adds more, and one purchase covers iPhone, Apple Watch and Mac with the same Apple Account.
FAQ
How do I add another time zone to the Mac menu bar?
macOS can't do it natively: the menu bar clock shows only your Mac's time zone. Use the World Clock widget in Notification Center (click the menu bar clock to see it) or install a menu bar world clock app such as Timeslide.
How do I change the cities in the Mac World Clock widget?
Control-click the widget, choose Edit “World Clock”, click the highlighted city you want to replace and pick a new one, then click Done.
Where is the World Clock on a Mac?
In the Clock app (World Clock tab) on recent macOS versions, and as a Clock widget you can add to the desktop or Notification Center through Edit Widgets.
Can I use my iPhone's widgets on the Mac?
Yes, if your iPhone runs iOS 17 or later and both devices use the same Apple Account. Turn on “Use iPhone widgets” in System Settings → Desktop & Dock → Widgets, and they appear in the Mac's widget gallery.
Do Mac world clock widgets adjust for daylight saving time?
Yes. macOS uses each city's time zone rules, so times update on their own when clocks change.